
In Celebration of Bread Making
BREAD. It is the simplest of recipes. At its basics, you need three ingredients:
- Flour
- Liquid
- Leavening Agent
So, why does breadmaking seem so complex and why all the extra ingredients and all the recipes? Why do some loaves seem dry and hard and some are soft and squishy? Why are some breads full of holes and others are crumbly?
Let’s first go back in time to understand a little history about breadmaking.
A Brief History of American Breadmaking
Bread is considered the “staff of life”. The one food that nearly every culture considers an essential. It wasn’t until after World War II that the consumption of bread declined most likely due to wider food choices, mass production of foods, and prosperity. Prior to this time frame, bread was served with nearly every meal and many symbolic rituals and traditions revolved around bread making.

In the early days of America, breadmaking was primarily done by the women of the household using a wood-fired oven or cook stove. In order to bake bread, one must get the oven or cook stove to a level of temperature capable of baking the loaf. For those who have never had the opportunity to bake with wood, this can be a cumbersome task. In the winter, fires were utilized to heat homes, so it was not as daunting a task to have a fire already going. In summer, however, a fire needed to be prepared first. Getting the fire to a point of heat can be upwards of an hour or more. In order to get the fire hotter, wood needs to be split into smaller pieces (more surface area) to get more heat in a shorter time. Softwoods often burn hot, but also burn faster than hardwoods and therefore require more material to burn. Hardwoods will burn hot and more even in temperature, but getting them to glowing coals takes time and some practice.
Of course, there were also specialized bread ovens at town bakeries where hot fires were started and once the fire was reduced to embers and the walls of the oven very white hot, bread was baked from the radiant heat. Additionally, bread could be baked utilizing radiant heat from embers from an open fire. Bread could be baked on a stone next to these irons or in a Dutch oven surrounded by the embers.

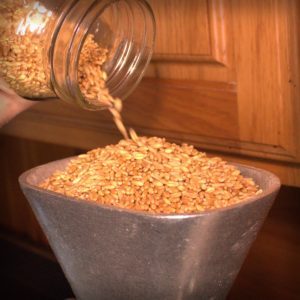
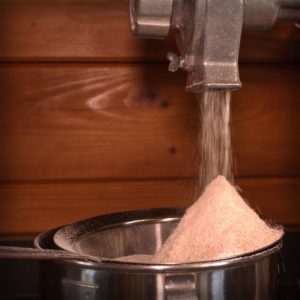
If the wait for the fire wasn’t enough, bread flour wasn’t a shelf ready product in the early years of America, so it needed to be ground. The bread makers started with dried wheat berries. Wheat berries were ground between two stones which turned the dried berries into a powder. The powder was then sifted to remove much of the bran and germ. In addition to wheat berries, other grains were also ground and used in bread such as buckwheat, rye, and corn. However, in yeast breads, most of the flour came from wheat berries as they contain gluten which is needed to aid in the capturing of the carbon dioxide released by the reaction of the yeast.

The bread maker also had to know the differences in the types of wheat. Some types of wheat have more gluten than others. Gluten is a plant protein found in wheat that will stretch when mixed with a liquid. Gluten is needed in yeast breads as it captures the air bubbles that are produced by the yeast as it ferments. Hard wheat has a high gluten content and is better for yeast breads. Soft wheat doesn’t have as much gluten and is better for cookies, cakes, crackers, and pastries.
A Basic Procedure to make a
Yeast Leavened Bread
With a yeast bread, you begin by getting the yeast to feed. With a dry yeast, this is called “proofing” or “proving” and basically means you add moisture, warmth, and food to the yeast to get it “going”. In our modern days, yeast is found at nearly every grocery store as a shelf item. However, in Colonial or Pioneer days, yeast was either purchased from a brewery (as a yeast cake) or made it by using potatoes, hops, or molasses to start what was referred to as a sourdough. Sourdough required a process using the wild yeasts found in nature.
Water has been traditionally the main liquid utilized in bread making, but milk was also utilized if the family had a cow, goat, or sheep that was in milk. (As a side note, to be “in milk” meant the animal had given birth and was lactating to a point that she could be hand milked. Most dairy animals produce more milk than is needed for their babies and produce longer in time than needed for the offspring). Breads made using water produce more of a savory flavor. Breads made using milk produce more of a sweet loaf.

Milk will make the bread more tender and give it a browner, softer crust. However, milk directly from a dairy animal contains acids that kill yeast. As this would not be the desired result (since getting the yeast to grow was the goal), all milk used in bread would be scalded. Scalded milk kills the acids that would kill the yeast and renders the milk usable for bread making. However, there is a trick to scalding milk. It cannot be too hot or it will kill the yeast. It also has to be hot enough to kill the acids. This is a fine line and should register a temperature of about 98 degrees Fahrenheit (often referred to as lukewarm or blood warm). If milk was not scalded, it would turn the dough lactic.
Once the yeast is proven, it is worked into the flour. After the initial mixing, traditional bread was kneaded on a floured surface. Often the traditional bread maker had a “feel” for when the bread was well mixed and ready for the first rise. At this point, the bread was shaped into a ball and placed into a bowl. The bowl was covered and left in a warm place until the first rise finished.

After the first rise, the dough was punched down and reshaped for the second rise. The dough was then placed in its baking vessel and left to rise again. Once the second rise occurred, the bread was baked.
For only three ingredients, can you understand the time and knowledge that someone had to have just to make a loaf of bread? Add to the bread maker’s workload, the water that was needed to clean the dishes used in the process. Water was traditionally bucketed from a well. If the bread maker wanted to clean with warm water, it would require more firewood to heat the water with fire.
What is considered a simple loaf of bread by today’s standards, in the pre-modern times, took an enormous amount of work, resources, and skill to get it right.
Most bread in the early 19th century only consisted of flour, yeast, water, and salt. In the later part of the 19th century, sugar, fat and milk was introduced more often.

Yeast
Yeast is a single-celled microorganism. In order to get it to grow (a process called fermentation), it needs food, warmth, and a liquid or moisture. In the process of fermentation, yeast creates carbon dioxide. The optimal temperature for yeast to grow is 100 degrees Fahrenheit (or 38 degrees Celsius).
Most bakers prefer fresh yeast because it has superior flavor and is reliable and manageable. Fresh yeast is mixed with lukewarm water prior to mixing with flour.
Conventional dried yeast is also used in modern breadmaking and is first reconstituted in warm water until frothy. This usually takes about 10 to 15 minutes.
Easy blend and fast action direct yeasts are added directly to the dry ingredients. First mix flour, salt and fat. Add the yeast to this mixture. Lastly, add the liquid.
Brewer’s yeast (also called beer barm) was traditionally used in breadmaking. It makes a bitter loaf and is not utilized as much in modern breadmaking.
Using the Sponge Method to Activate Yeast
In the sponge method, yeast is mixed with more warm water than usual. To this mixture, add flour to make the mixture similar to a batter. Leave the batter mixture for at least 20 minutes or even longer.
In the case of French breads, sponging (or fermentation) is left for two to twelve hours. By using a slow ferment, a “poolish” sponge forms which produces a bread that is low acid, fragile, and has a crunchy crust. You are looking for bubbles to appear on the surface. This entire process is known as “sponging” and it has an advantage of allowing the yeast to begin working without being inhibited by other ingredients that could slow the action of the yeast. Sponging batter will often resemble the look of pancake batter. Other ingredients such as eggs, fat, and sugar are added later. A wet sponge will rise more quickly than a firmer dough.
Italian bakers will often use a similar variety of sponge but will not utilize as much liquid. Ferment is usually 12-15 hours. Italian sponges are called biga sponges.
When using the sponge method, the batter should double or triple in size, then fall back. This will indicate that it is time to use.
Leavens Other Than Yeast
Yeast is only one type of leaven. Other leavens include bicarbonate of soda (baking soda), baking powder, and cream of tartar.
Bicarbonate of soda is an alkaline chemical that reacts when mixed with acid and moisture.
Baking powder is a mixture of acid and alkaline chemicals that need moisture to react.
Cream of tartar is an acid. It is made from fermentation of grapes. Cream of tartar is often used with baking soda in making soda breads.
Soda breads are also made from soured milk or buttermilk and baking soda. Soured milk and buttermilk are both acids.
Other Ingredients Used in Bread
Sugar
Sugar helps to feed the yeast and adds a brown color to the crust due to caramelization. Whole wheat flour is limited in being able to feed the yeast, so often sugar is added. In pioneer and colonial times molasses was often used as it was less expensive than sugar. Because molasses was inexpensive, it was often used in amounts considered excessive by today’s standards. Sugar helps breads to brown.
Sugar is not needed for savory breads.
Sugars can include white sugar, brown sugar, honey, molasses, maple syrup, sorghum, confectioner’s sugar, treacle, and golden syrup.
Dry sugars are normally added with the flour. Liquid sugars such as honey, molasses, or treacle are warmed and added with the baker’s choice of lukewarm liquid.
Salt
Salt halts the action of yeast so it was utilized sparingly in Pioneer and Colonial times. Salt aids in the taste of bread and little salt is often associated with a flat taste. Salt strengthens the gluten. Never add salt directly to the yeast.
If there is too little salt, the loaf will stale quickly. If there is too much salt, the loaf will harden.
Fats and Oils
Fats and oils keep breads moist and tender. Fats and oils also help keep bread fresh longer. Fats commonly used include lard, butter, or meat drippings. Modern day bakers also use oils and solid vegetable fats (shortening). Oils can include olive, walnut, almond, coconut, and sunflower. When using butter, unsalted or sweet butter is preferred in bread to salted butter. Butter should be melted or diced before adding to the mix.
For note, butter in large quantities can inhibit yeast action so in some recipes it is added to the dough after the initial rising.
Eggs
Eggs are sometimes added to the dough. Eggs need to be beaten prior to adding to the mixture.
Fruit
Almost any dried fruit can be added to bread. Common fruit choices are raisins, sultanas, currants, mixed peel, chopped dates, apricots, prunes, dried mangos, and dried papaya. Fruit is added to the dough either during the initial mix or during the second kneading.
Nuts, Herbs, Pitted Olives, and Sun-dried Tomatoes
Nuts, herbs, pitted olives, and sun-dried tomatoes should be roughly chopped before adding to the dough. Add to the dough after the first rising.
Spices
Spices can be added to the dough for additional flavor. Spices are either sweet or savory. Sweet spices include cinnamon, nutmeg, cloves, and ginger. Savory spices include cumin, fennel, carraway, and anise. Some spices are considered both sweet and savory. These include mace, pepper, and coriander seeds.
A note about All-Purpose Flour, Cake Flour, Graham Flour, and Bread Flour
All-purpose flour is what is typically sold at the modern grocery store. For breadmaking, unbleached is preferred. The protein/gluten content of all-purpose flour is around 10%. This is adequate protein for a “chewy” bread. Bleached all-purpose flour is not recommended for breadmaking as the bleaching process removes some of the protein.
Cake flour is not recommended for breadmaking with yeast as it is only about 8% protein. The lack of protein will create a dry loaf.
Graham flour is not recommended for yeast breadmaking. It is very low in protein.
Bread flour typically contains about 12-13 percent protein which is sufficient for yeast made breads.

Steps to Make Bread
Yeast Preparation
Yeast requires two things to become active: moisture and warmth.
If you are going to make the bread the same day, start with
fast acting yeast and add the correct moisture (usually water or milk). Once the mixture becomes bubbly, add it to
the flour and other ingredients.
You will want your liquid to be the correct temperature when
mixing with yeast and this is suggested at 98 to 108 degrees Fahrenheit (37-43
degrees Celsius). A “trick” to get the
correct temperature of water without a thermometer is to mix two parts cold water
with one-part boiling water. This will result
in approximately the correct temperature.
If you are making bread for the next day, start by making a
sponge. A sponge is made by mixing the
yeast with the liquid and a portion of the flour. It is then covered and left to ripen
overnight in temperatures ranging between 45- and 60-degrees Fahrenheit. (In modern times this often would require storing
in the refrigerator overnight).
By soaking flour for 12-24 hours in hour or cultured milk, buttermilk,
or cream you will get what many bakers believe is a better flavored loaf. If you don’t have cultured milk, buttermilk
or cream, the liquid can be substituted with a combination of water and one of
the following: whey, yoghurt, vinegar,
or lemon juice. These acidic liquids will
help to break down phytic acid in the bran of grains by activating the enzyme
known as phytase. Sour milk products
also provide lactic acid and lactobacilli that aid in breaking down complex
starches, tannins, and difficult to digest proteins. Soaking flour also increases vitamin content
and makes all the nutrients in grains more available.
Never use salt when soaking flour.
Other liquids used in breadmaking include potato water (the remaining water from cooking potatoes), and stale beer. Beer needs to be scalded and cooled prior to using in bread.
Add the yeast mixture to the flour and other ingredients
Start with the dry ingredients and make a well in the
center. Add the yeast mixture to the dry
ingredients and mix well. Work in any
remaining ingredients.
Knead the Dough
When the dough becomes too hard to beat, switch to kneading
it. Kneading can be done by hand or by
using a dough hook.

To knead by hand, first dust your work surface with flour. Place the dough in the middle of your work surface and using straight arms, sink the heels of your hands into the dough while pushing away. Fold the dough towards you and back on to itself. Give the dough a quarter turn and repeat the process. Add flour as you knead the dough until it is not sticky and feels like skin. This will take about five minutes. Dough is properly kneaded when you can stretch it without tearing it.
First Rise
Once you have a nice smooth dough ball, grease it and place it in a bowl. Cover the bowl with a towel or plate and place it in a warm area to rise. Ideally, the temperature should be between 75 to 100 degrees Fahrenheit. The dough should double in size before proceeding to the next step.


Punch Down the Dough and Shaping
Take the risen dough and punch it flat. Shape it into an oblong rectangular shape for a loaf or a round mound for a round loaf.
Second Rise
Let the shaped dough rise again in similar conditions to the first rising. Let the dough rise to about double the size again.
Baking the Loaf
The oven should be preheated prior to baking the bread. The temperature and timing would depend on the recipe. The pioneers and colonial period bread bakers knew when their bread was done by the shape, the browning, and the hollow sound it would make when tapped. Bread will usually shrink from the sides of the pan when it is finished.
Early 19th century bread ovens were set in the masonry of the fireplace behind an iron door with a small flue leading to the main chimney. Some bread ovens were erected outside, as well. Very hot fires were built in the ovens and then reduced to hot coals. The coals were then removed and the bread was inserted for baking.
For reference, often bread recipes call for an oven between 350- and 450-degrees Fahrenheit. It usually takes about an hour to bake a traditional sized loaf. Often, temperature is based on the ingredients. Bread containing eggs or honey are typically at a 350-degree oven. Breads with over 50% whole wheat or brioche dough are baked at the lower 350-degree oven. Non-enriched doughs (mainly made from white flour) are typically at the higher 450-degree oven.
Cool the Bread
Turn the bread out onto a clean towel and let to cool. Do not allow hot bread to cool directly on a wood surface. A cooling rack can be used as well. Do not cut into hot bread. Allow it to cool first. Melted butter or other fats or oils can be brushed onto the hot bread to keep the crust softer.

OTHER TOPICS
Salt-Rising Bread
Salt-rising bread was found in a few references. The following summarizes the salt-rising bread process:
A pint of hot water was poured over one-half teaspoon of salt in a two-quart pitcher. Once the pitcher was lukewarm, 1-1/3 pints of flour was added. The batter was mixed well. The pitcher was left in a kettle of lukewarm water until twice its size (about five to eight hours). During this time, the batter was stirred once or twice. This mixture was then added to a sponge made of one quart of hot water and 2-1/2 quarts of flour. Add more flour until the dough is soft. Mix this well and let rise. Then mold into loaves, let rise again, and bake.

Sour-Dough Starter
A sour-dough starter develops from microscopic wild yeast and bacteria present in the air. Sour-dough is therefore a natural leaven. Typically, sour dough is kept at a batter consistency. In pioneer and colonial days, it was worked into a dry mixture and kept in the flour sack while traveling. Sour dough starter is used to make sour dough bread. Breads not made from sour dough are referred to as sweet loaves.
Sourdough breads need to have high-gluten flours for good results. Flours such as spelt, kamut, hard winter wheat, or rye have gluten.
Many factors effect sour dough starter.
Water. Spring water is best used in sour dough starter. Chemically treated water can sometimes cause problems with wild yeast.
Temperature. Sour dough starter should be kept in a warm environment ideally between 80 and 95 degrees Fahrenheit.
Humidity. Yeast needs moisture in order to survive. The amount of moisture in the air will determine the type of loaf produced from airy to dense.
Sour dough starter should have bubbles and show expansion. This is proof that the starter is alive.
Each time sourdough is used, some is kept back and refreshed with equal amounts of flour and water.
To make a French sourdough starter that can be kept in the refrigerator up to ten days, start with one cup of flour and five Tablespoons of water. Mix and knead the dough for about 3-5 minutes. Cover the mixture and let it alone for two to three days. The mixture will turn a grayish color with a sweet-sour smell. There will also be a soft crust. The crust should be removed and discarded. Add warm water (about a half cup) and additional flour (about 1.5 cups). Once again, make a dough and cover. In one to two days, remove and discard the crust. You now have a sour dough starter. Use this starter to make bread. Always leave about a cup behind for the next sourdough.
Quick Breads
Quick breads are leavened chemically with baking soda or baking powder. Quick breads are not kneaded. When making quick breads, only mix until moist. Do not over mix. Chemical leavens react with an acid to produce carbon dioxide. A typical rule of thumb is to add two teaspoons of baking powder for each cup of non-gluten flour along with any called for baking soda.
Conclusion
Bread was historically a very important part of every meal. At its simplest form, it is three ingredients, however, there is so much diversity in how the three ingredients were brought together. Additional ingredients added to the base makes for an endless number of types of bread.
Breads are typically classified as yeast types or non-yeast types. Each type of bread has a different procedure in order to get air into batter and finally to the final product. Historically, most breads were made with yeast and required a long time to make. More modern quick breads use alternative leavens to get to the final product in a much shorter time frame.
For all its simplicity and also its complexity, we hope you enjoyed this celebration of bread. We also hope that maybe we have inspired you to try making your own bread recipes. Please drop us a line if you do. We love hearing from our readers.
References:
Alderson, Erin, The Homemade Flour Cookbook. Fair Winds Press, USA, 2014. ISBN 978-1-59233-600-5
Clayton, Jr., Bernard, Complete Book of Small Breads, Simon & Schuster, U.S.A., 1998. ISBN 0-684-82692-5
Fallon, Sally with Mary G. Enig, Ph.D., Nourishing Traditions Revised 2nd Edition. New Trends Publishing, Inc., Washington DC, 2001. ISBN 0-9670897-3-5 / 978-0-9670897-3-7
Hertzberg, Jeff and Zoe Francois, Artisan Bread in Five Minutes a Day. St. Martin’s Press, New York, 2007. ISBN 13: 978-0-312-36291-1 / 10: 0-312-36291-9
Ingram, Christine and Jennie Shapter, Bread. Hermes House New York, NY, 2002. ISBN 1-84309-500-9
Oddo, Sandra, Home Made. Galahad Books, NY City, NY, 1972. ISBN 0-88365-250-1
Walker, Barbara M., The Little House Cookbook, Harper & Row, Publishers, New York, 1979. ISBN 0-06-026418-7, 0-06-026419-5
Pioneer Mountain Homestead
16477 Sharman Lane
James Creek, PA 16657
814-505-6426
"Embracing Everything Farm and Forest"
Disclosure of Material Connection: Some of the links in this page or post may be “affiliate links”. This means that if you click on the link, Pioneer Mountain Homestead, LLC may receive an affiliate commission at no direct cost to you. Pioneer Mountain Homestead, LLC only recommends products or services that the owners, managers, or employees of Pioneer Mountain Homestead, LLC use or believe will add value to the readers of this website. This disclosure is made with the Federal Trade Commission’s 16 CFR, Part 255: “Guides Concerning the Use of Endorsements and Testimonials in Advertising.”